
If you have a miter saw and a tree branch, then I have a craft for you that goes beyond coasters (And a great project for older kids).
I started a tradition last Thanksgiving of giving my nephews and my son Christmas ornaments. This year, I wanted to also incorporate some branches I saved for crafting. I experimented with both birch and redwood for this craft. Overall, the birch was easier to work with verses the redwood, however, in the end I chose redwood primarily because I thought it was prettier.
Here’s what you need:
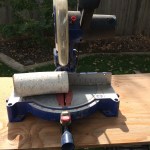
Miter saw (also known as a chop saw)
Drill and wood drill bit (to make hole)
Tree ranch that is consistent in size and is straight
Chalk board paint
Pencil and eraser
Ruler
Wood burning tool with ball point and calligraphy tips
Chalk pencil or permanent chalk marker ( I ended up using a metallic marker)
-
- Miter saw and birch
-

- Wall Lenk L30WBK-W Woodworker’s Woodburning Kit
-
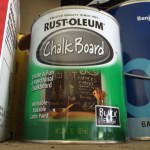
- Chalk board paint
I chose to cut my rounds 1/2 inch thick from a branch that was about 3 inches in diameter. Just a suggestions, cut as many rounds from your branch as possible regardless of how many you will actually need. For example, I needed four rounds, but the branch I chose was long enough to make ten, so I cut all ten. This is because wood isn’t perfect and you never know what kinds of imperfections or colors you will discover once you slice into it. Afterwards, pick your favorite pieces for your project and use the rest for practicing ideas or coasters for your table (A pack of 6 makes for a great hostess gift).

This piece of birch has water stains, soft spots and pink marks. Each round is one of a kind!
Drill a hole at the top of your round. Paint one side with the chalk board paint. For me, it was easier using my finger to paint because I didn’t want to get any on the bark.

Example of a redwood round drilled and painted.
You remember those extra rounds? Ok! Bust them out to practice using that wood burner! Every piece of wood is different and you want to get the feel for what you are working with before you do your final piece. Why? Because you cannot erase burnt wood, LOL, so you have only one shot! No pressure…
-
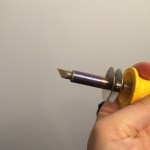
- calligraphy tip
-

- Practice to see what tips work
-
- ball point tip
I cannot free-hand anything. For real though. So I used printed images to to inspire me. Remember, these aren’t perfect circles, so centering images can be tricky. I sketched my image with a pencil so I could erase if needed and clean up when done.


After, and only after, feeling confident in practicing with the burner, I went to work. I found that the calligraphy tip worked great for straight edges and the ball point was perfect for rounded ones.

Imperfect and adorable!
Then came the hand lettering on the chalk side. Again, I need ideas in front of me and to pencil out what I want to do ahead of time. I used this book:


I went over the penciled areas with a chalk pencil, but ended up using a metallic paint pen instead based on my own personal preference.


My nephews loved their gifts and I know I was happy with the one I made for my son. Mine aren’t fancy enough for etsy, but I know some of you could probably make money off your mad skills! Enjoy!
Written by Mariah Cook, AKA Auntie MoMo.


